
For challenge 1, you will be building the Lego Mindstorms EV3 TRACK3R robot and using the Open Roberta software to drive the robot straight on a board without going over it, as pictured below.

Algorithm
The robot repeats driving until the color sensor doesn’t sense brown.
- 1: Drive at 50% speed
- 2: Repeat it until the color sensor detects white
Building Plan

The robot you will be building is called the TRACK3R. The instructions and information for the robot can be found at Lego’s website.
Program
Pictured below is the program I used for completing the challenge. I made it specifically to use with the color sensor.
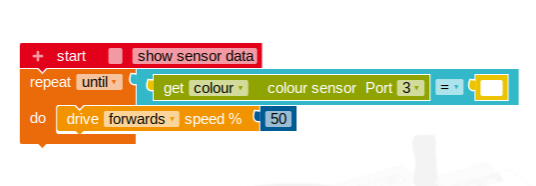
The code says to repeat driving forwards until the color sensor will detect white. I used the color sensor instead of driving a certain distance because it doesn’t matter the length of the track, it’ll still stop before going over it.
Building Process Reflection
The components I added were the color sensor to the front of the robot to detect when the robot does not sense brown in my programming. I also changed the mechanism in where the color sensor attaches to the robot so the sensor can go lower to the ground.
The first problem I ran into was the robot wasn’t moving all the way across the board, so I then measured the length of the board and also factored in the length of the robot which has to start in front of the board, not on the board. Then again, the robot was still only making it part way.
I then saw that I could add a color sensor. I then changed my code to repeat driving until the color sensor did not sense brown, the color of the board. There I ran into another problem, the robot would go over the board now. After inspecting the robot, I may have found a reason why it was going over the board, maybe the color sensor was not fast enough to detect the change in color. I then modified my color sensor to extend out further. Once I did that, the robot was still going over the board.
After a few more runs along the board, I then figured out the source of the problem, the color sensor was not detecting the ground until the robot went over the end of the board, which at that point the robot teeters between the board and ground. I moved the color sensor closer to the floor, which fixed the problem and the robot stopped at the end of the track without crossing the lines.

The most difficult part of this build was most likely troubleshooting the color sensor since I didn’t know exactly what was going wrong, I had to observe what was going on with the robot at the time it should be stopping and detecting that the board was not there anymore. What worked well, for the most part, were the motors and structure of the robot. The robot had a consistent run which was good for troubleshooting and testing since it ran the same everytime which was one less variable to consider during the troubleshooting process which made it easier to find the source of the problem.

I liked that you said what worked well and what didn’t, you should add a picture of the color sensor that is on your robot.
LikeLike
Nice job with all of the visuals. They offer great interpretation on the proper building and testing steps for viewers. Also, the chart was a nice touch. It gave them an idea of how many times the steps may have taken you and will offer positive feed back to those who are not as successful with their robots.
LikeLike