Second Challenge: Turn Left

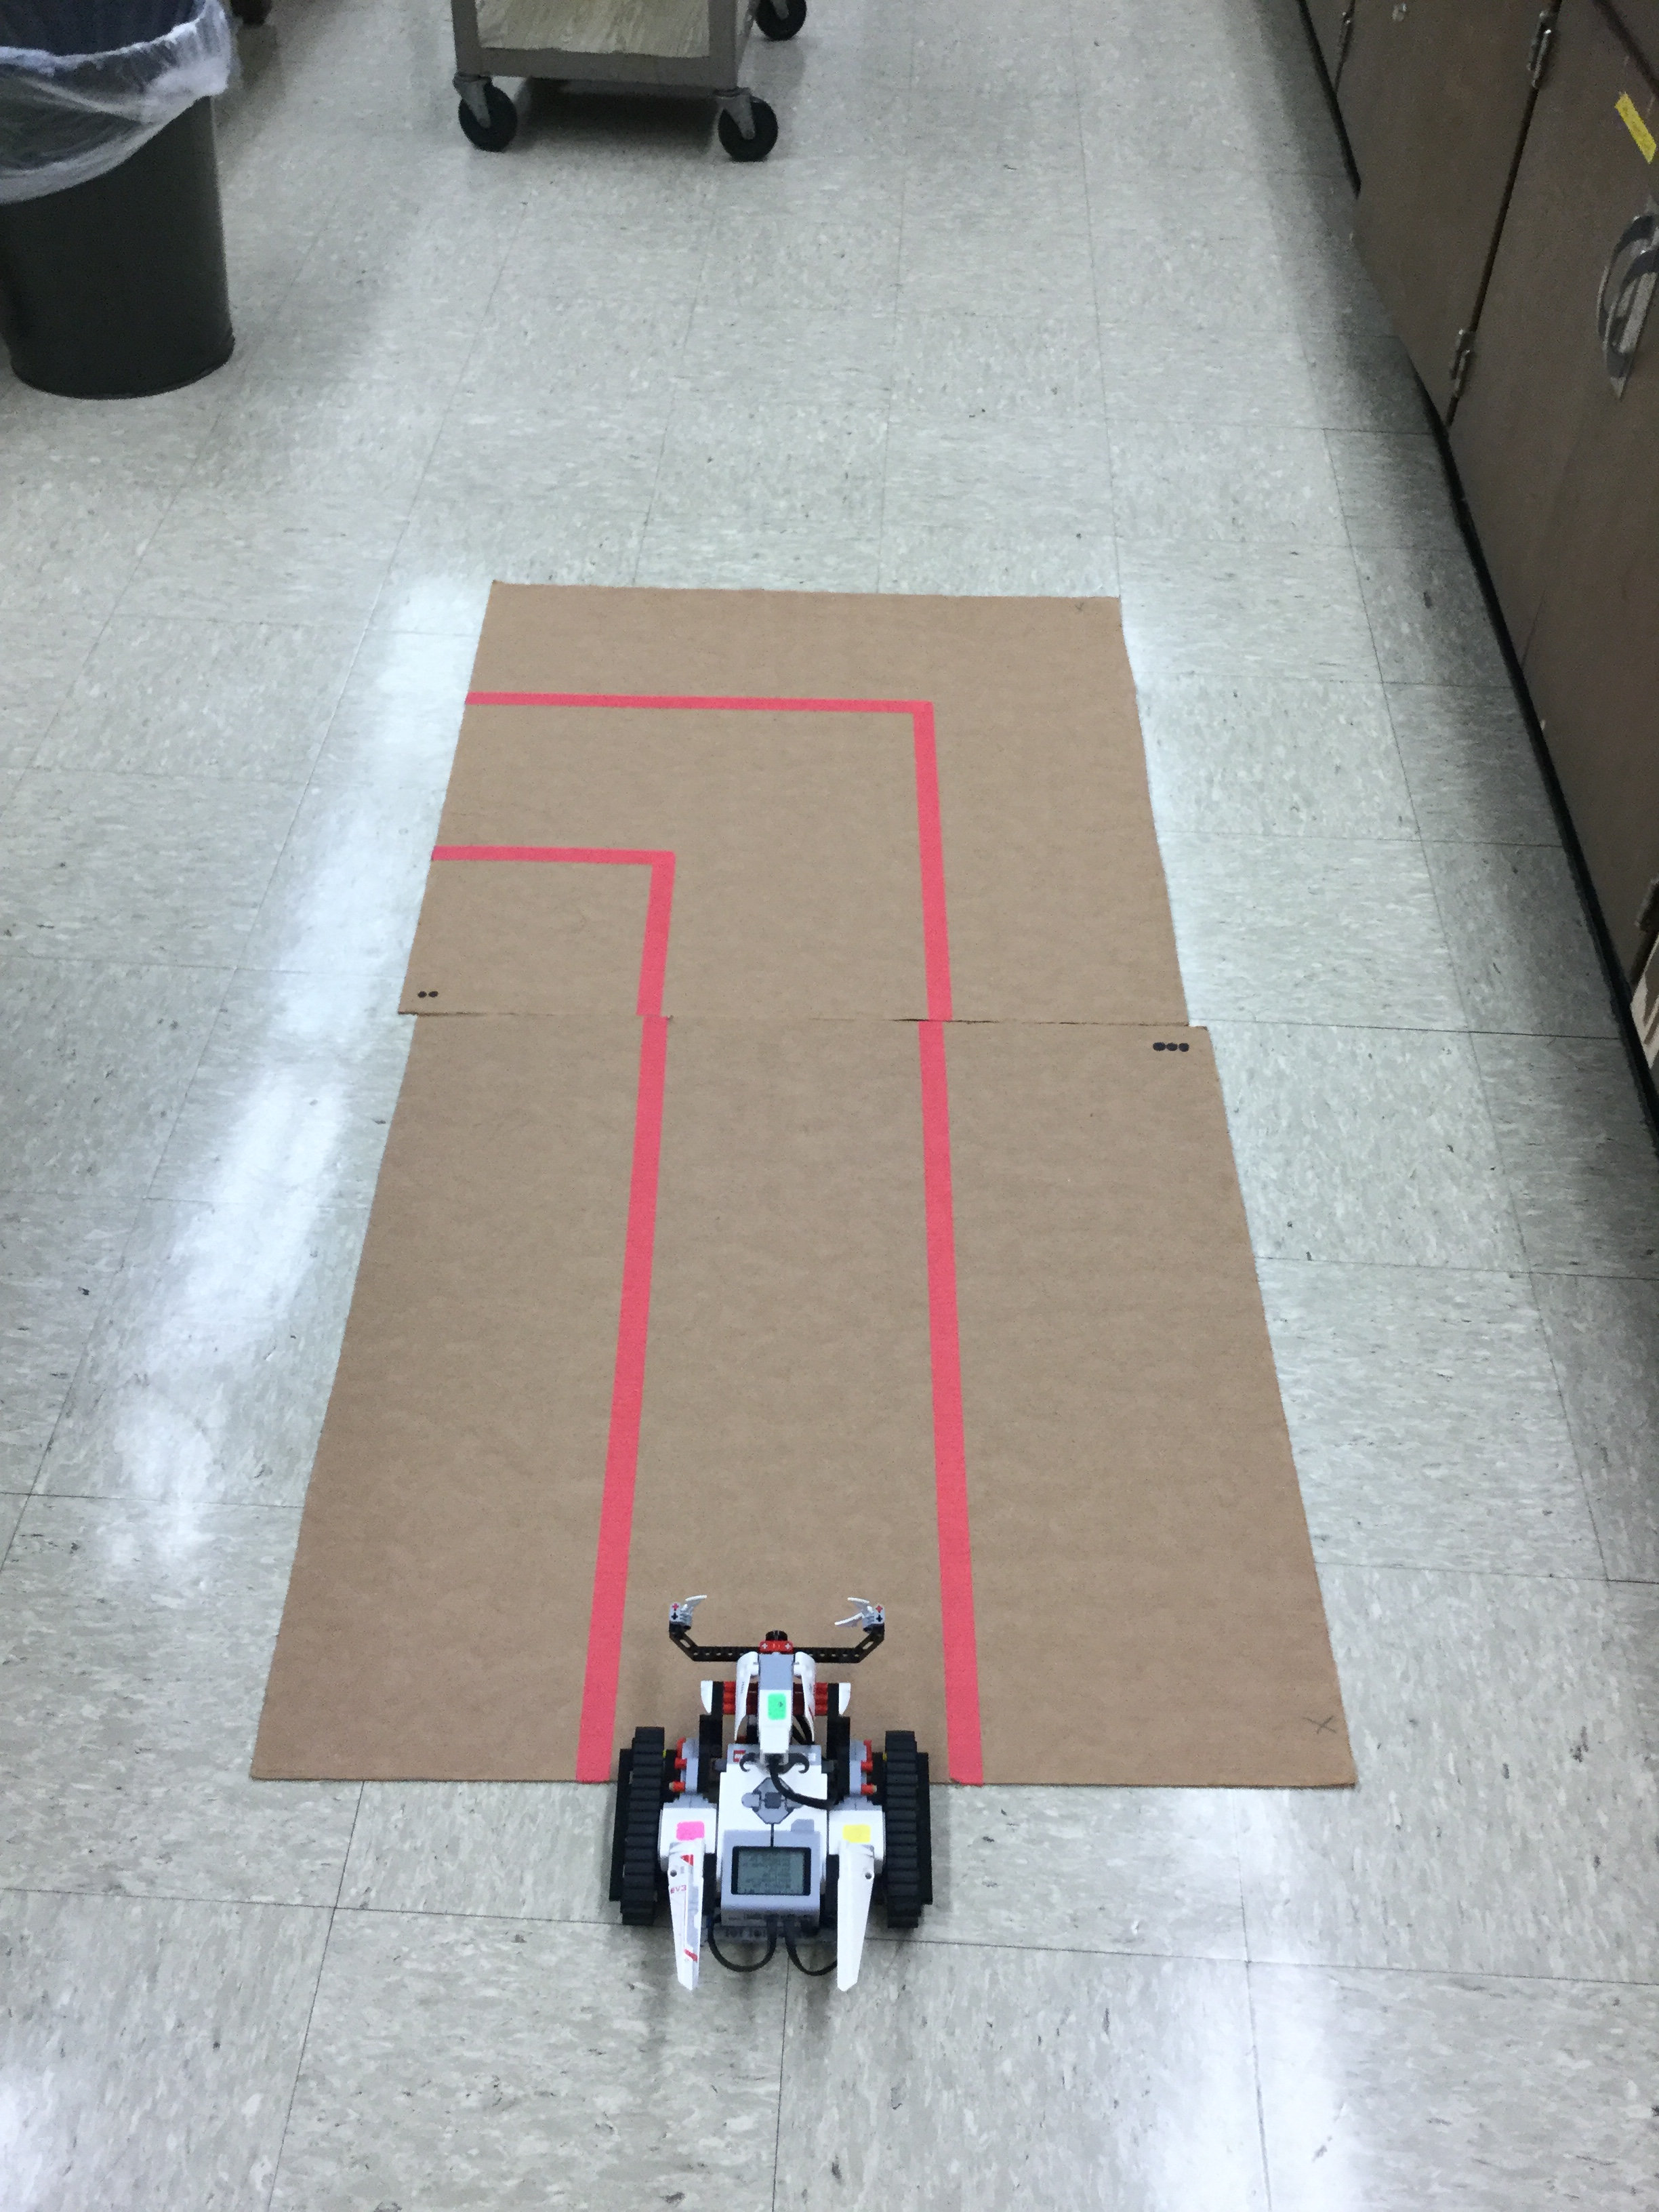
In the second challenge, you will have to direct your robot to make a left turn while staying in the lines, as pictured below.

You need to program the robot so that it will turn left without passing the red line.

Algorithm

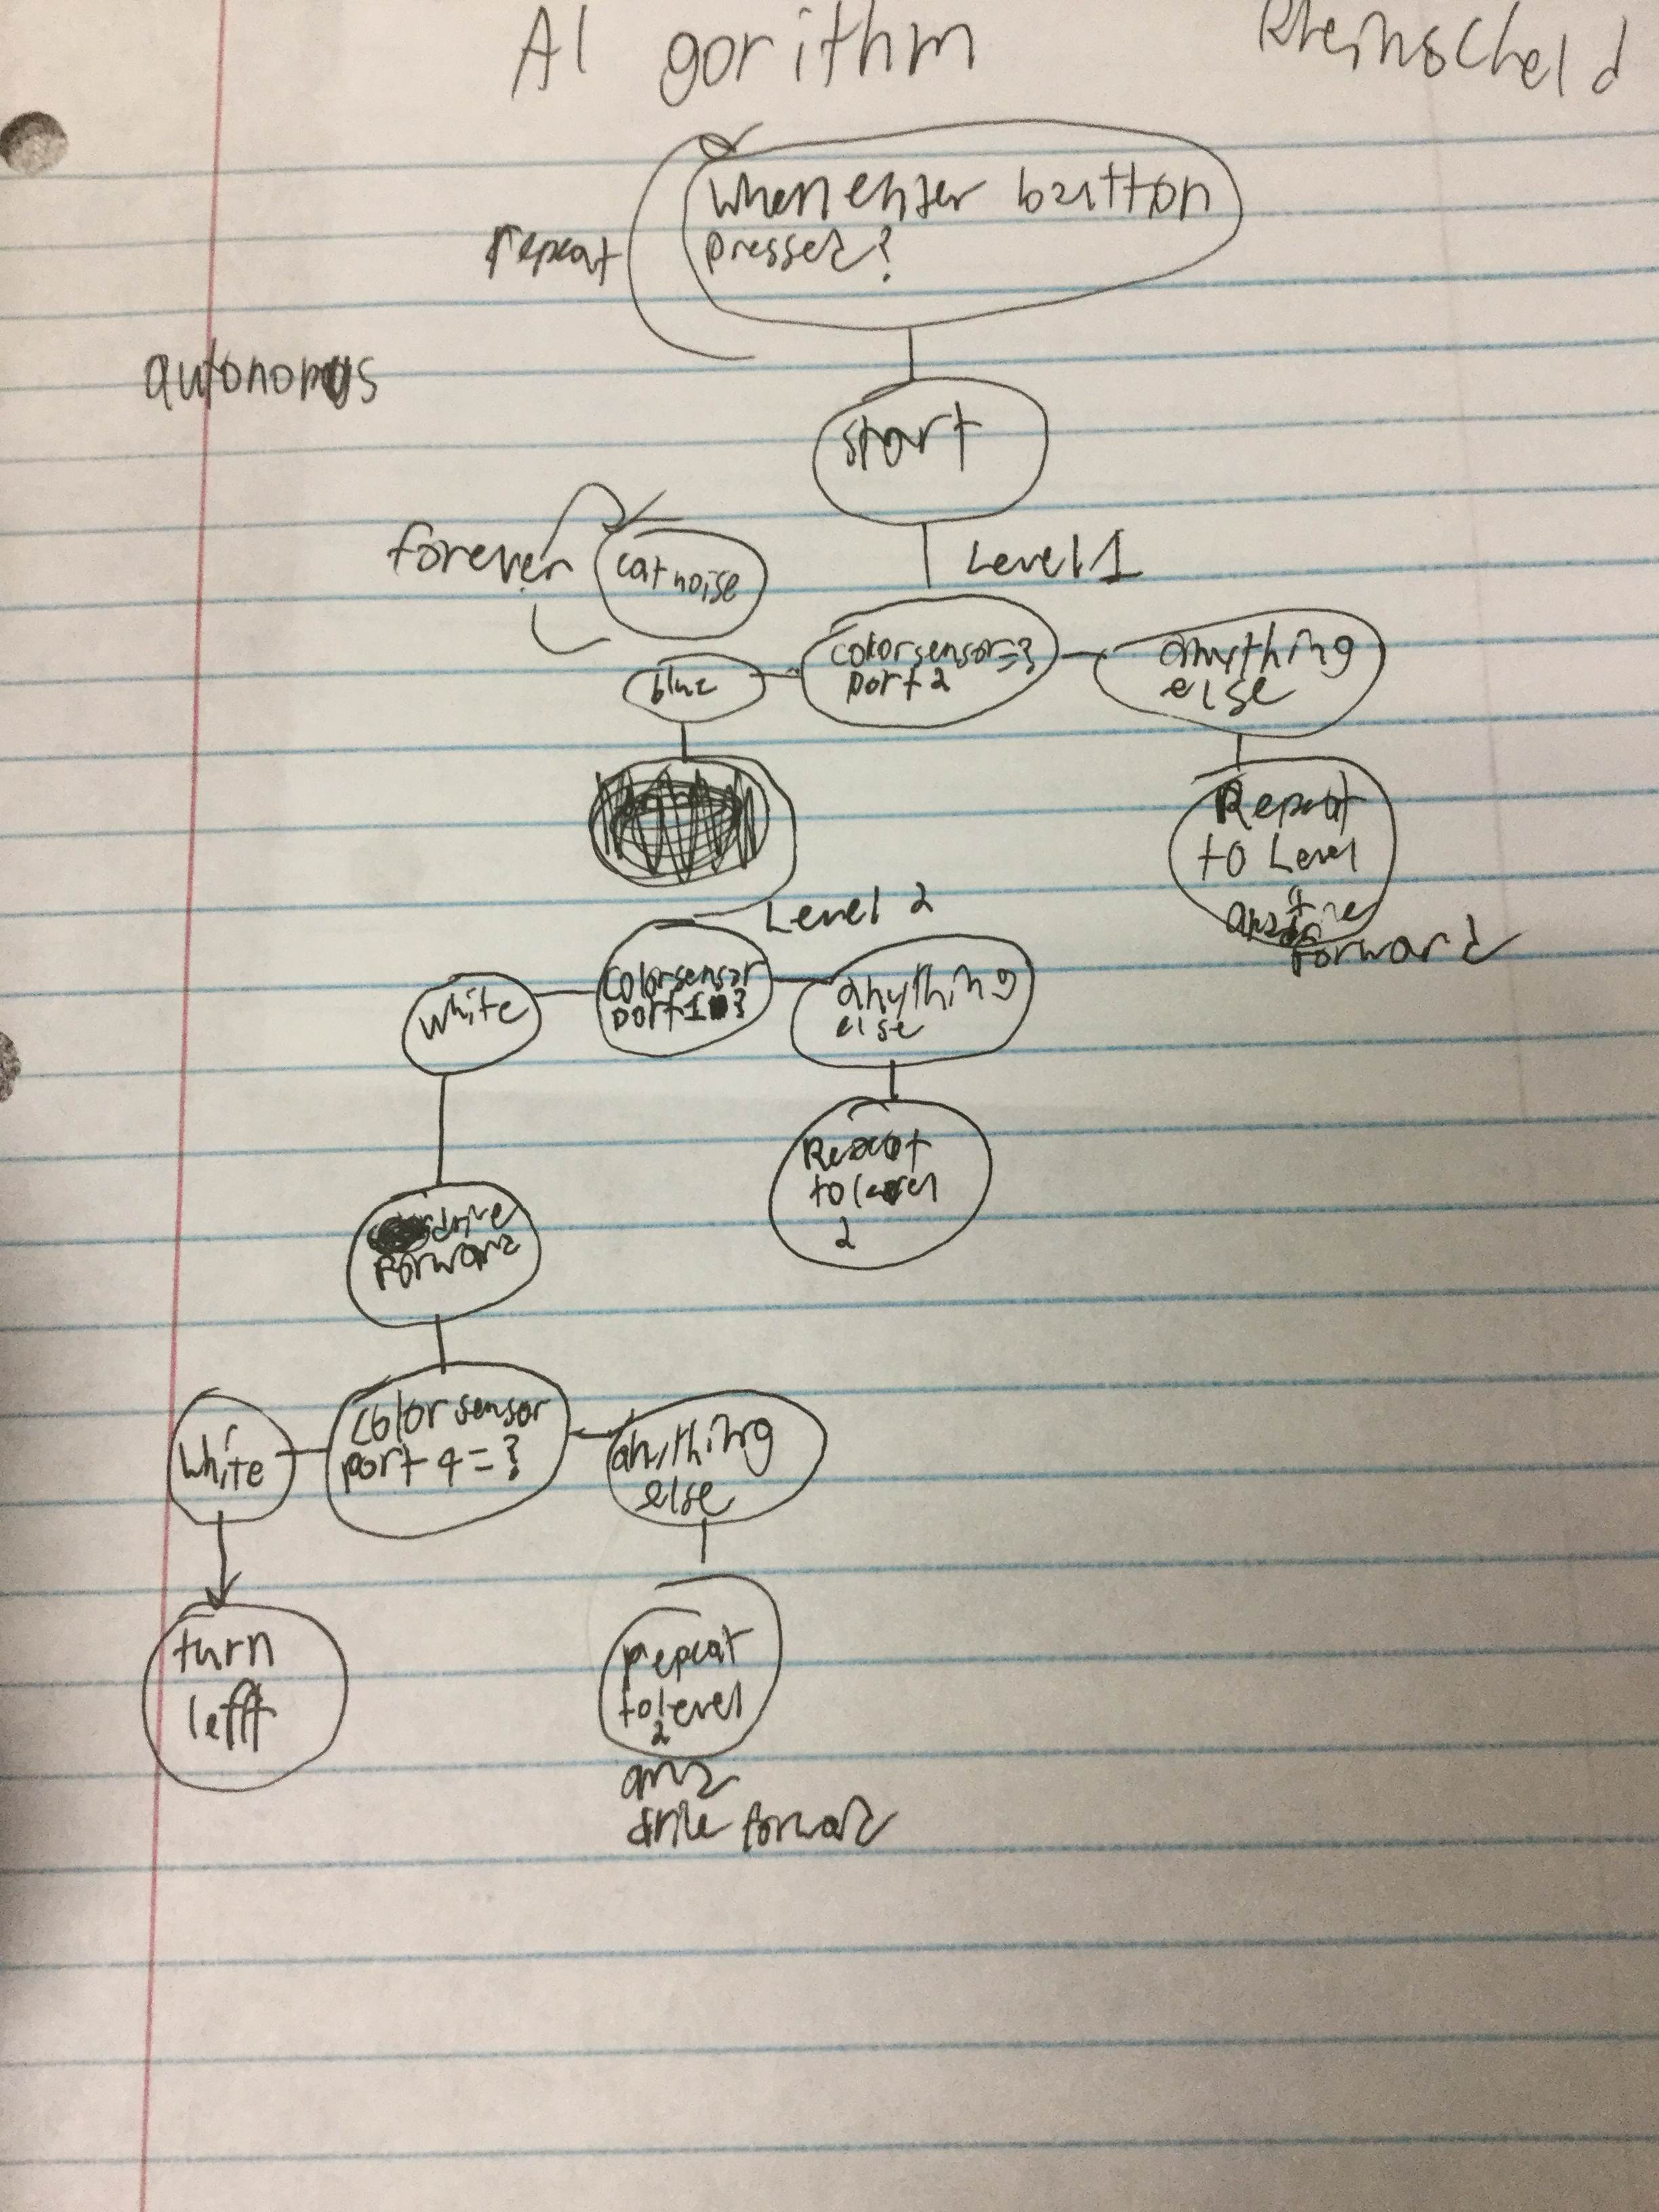
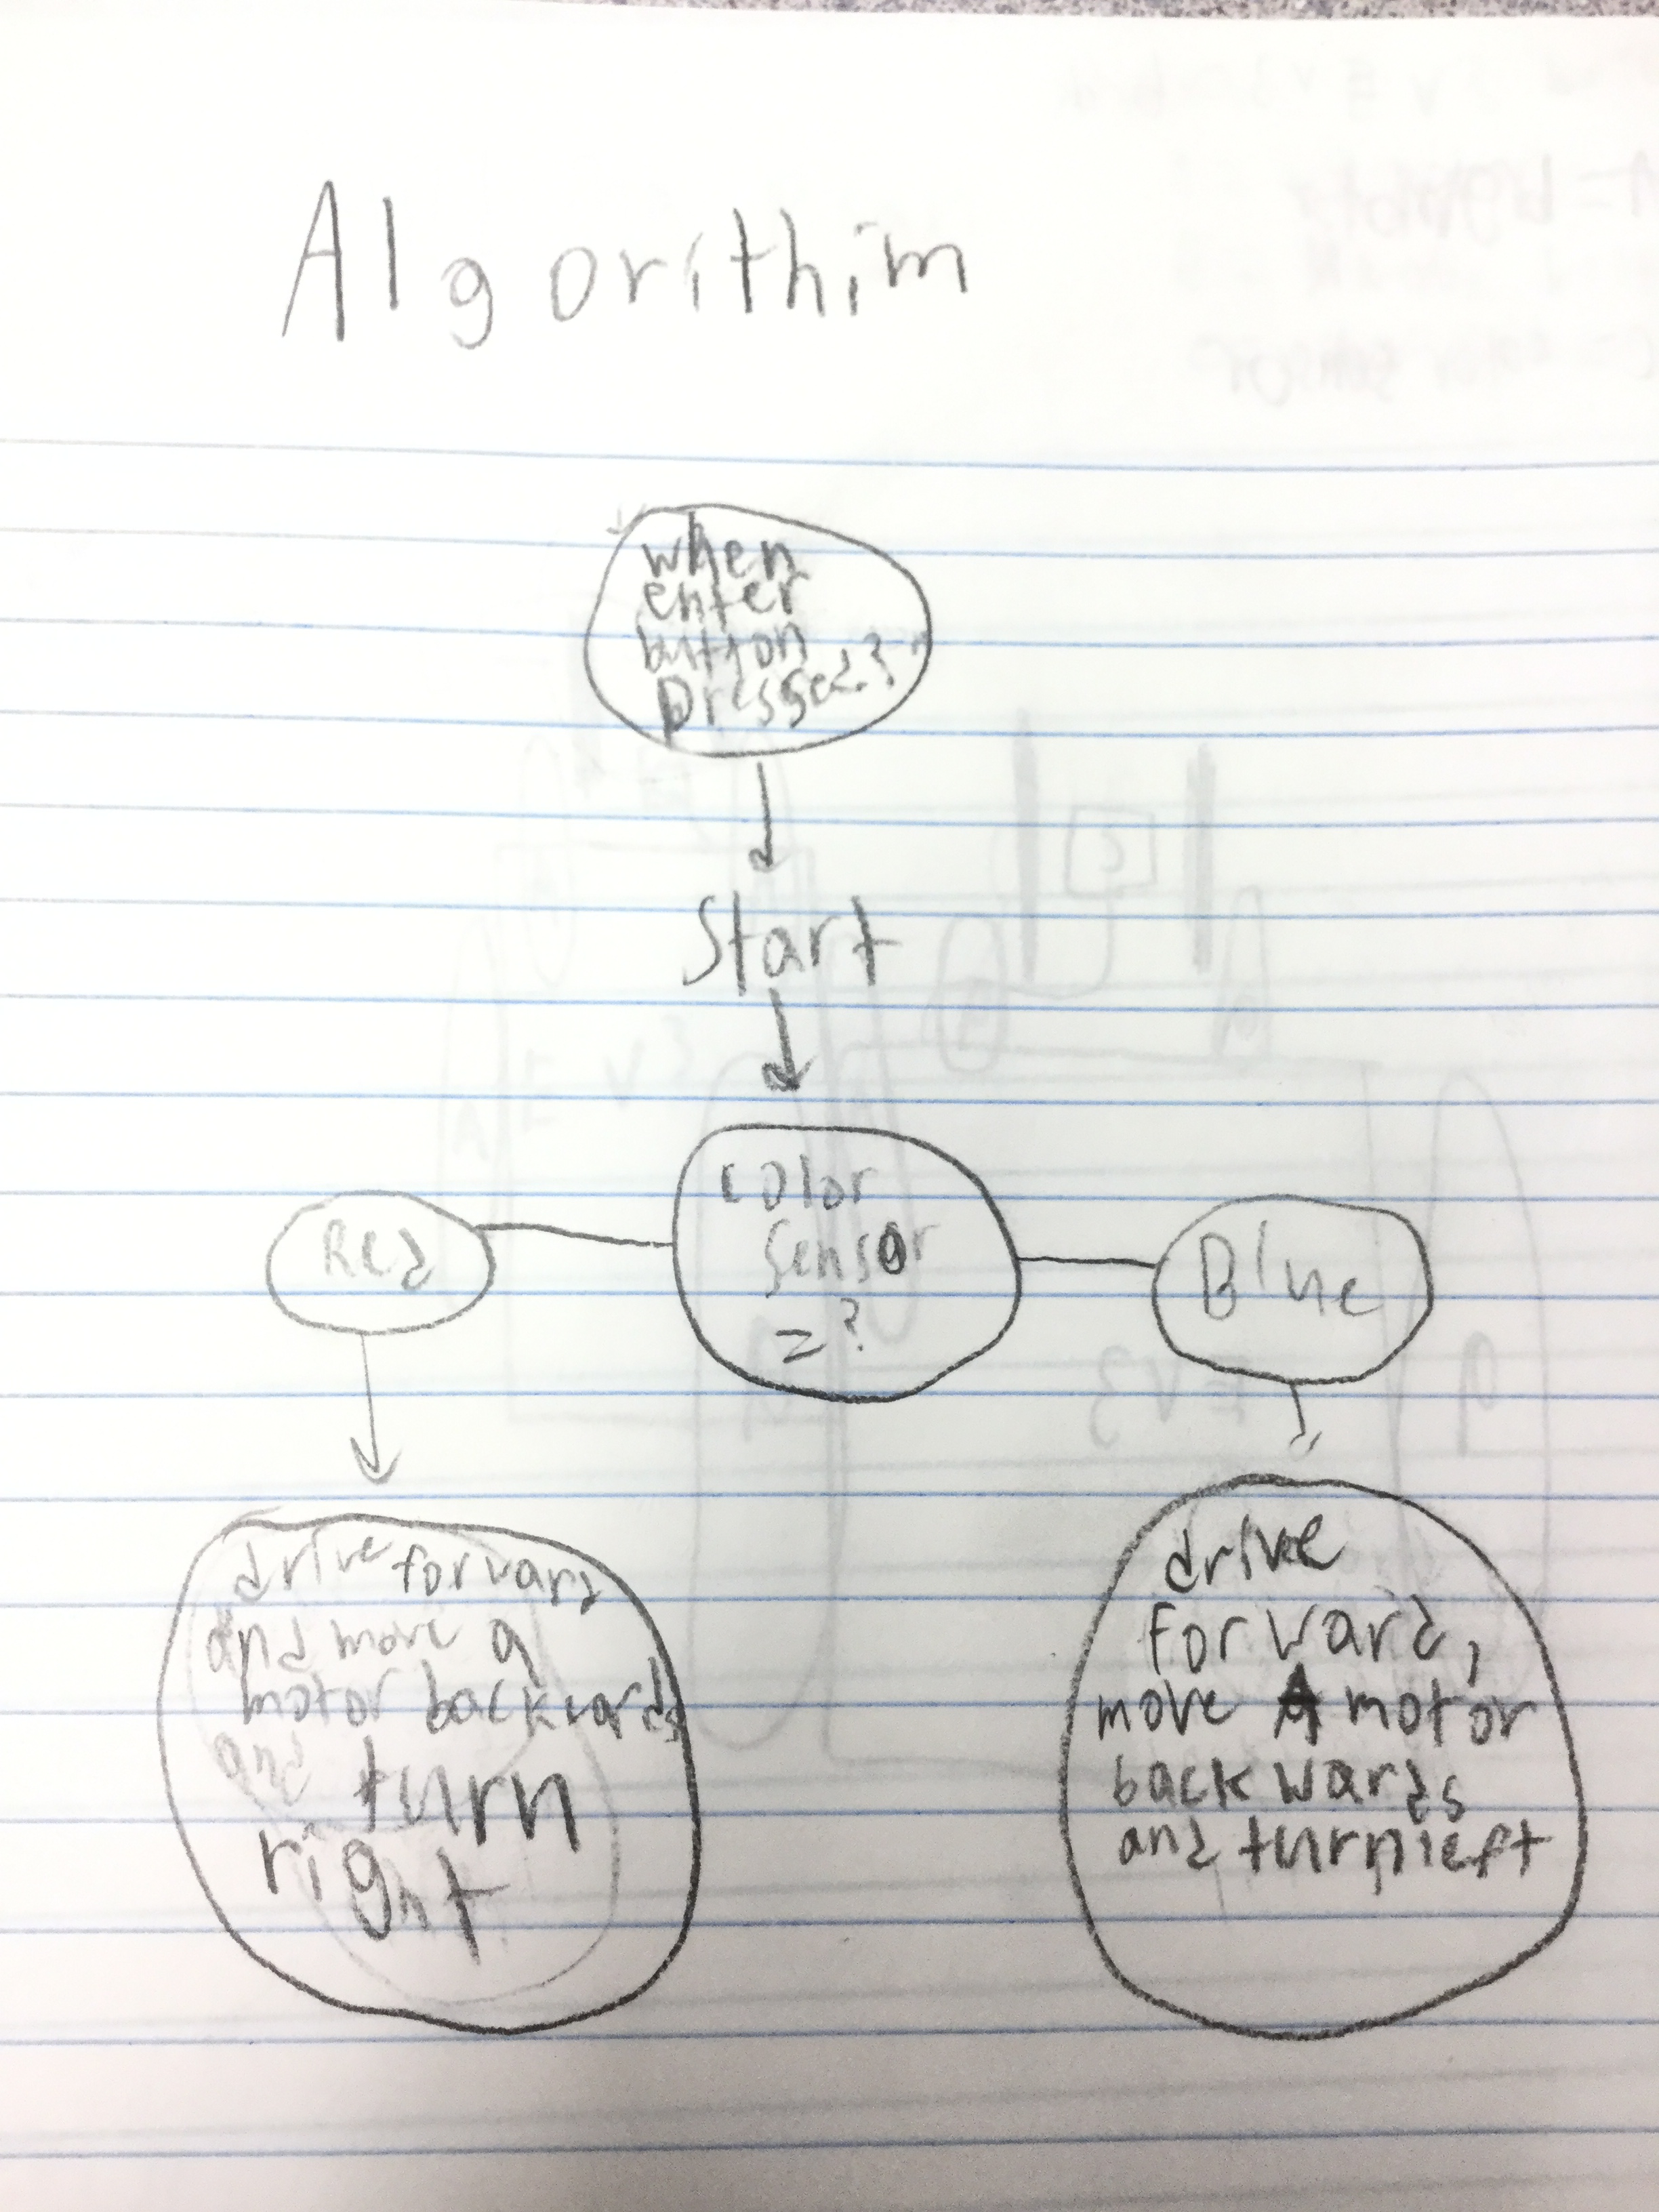
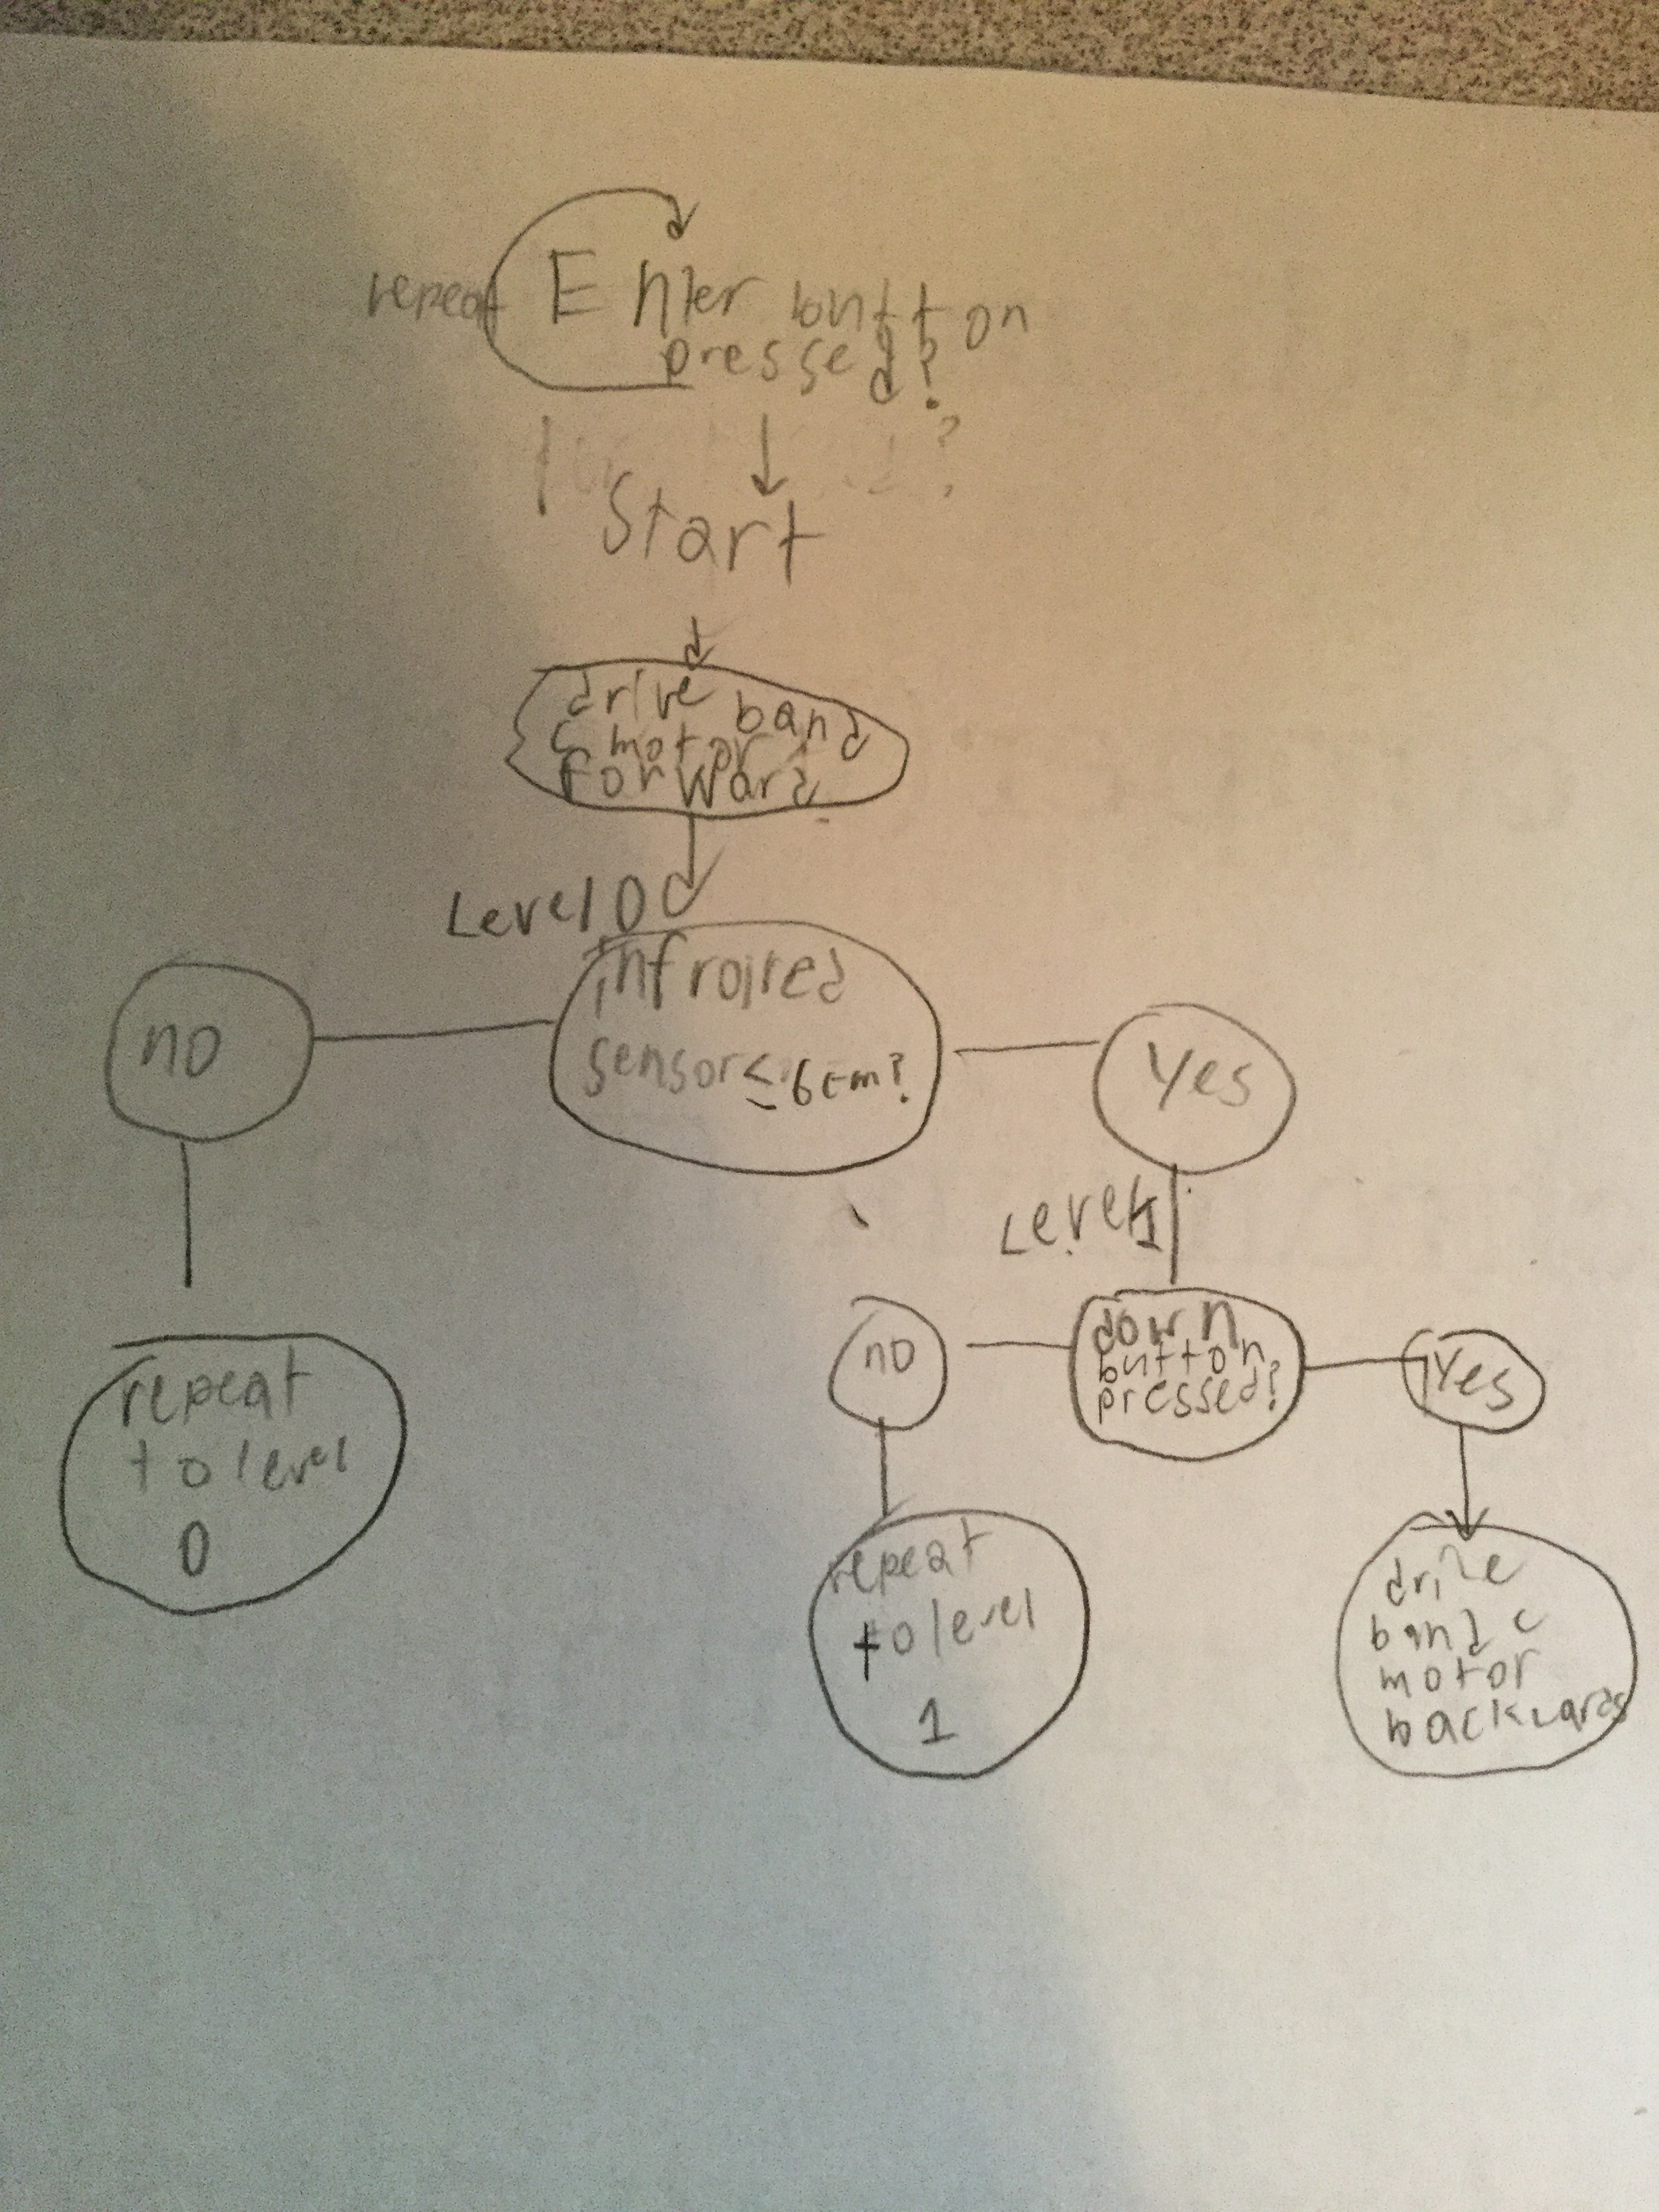
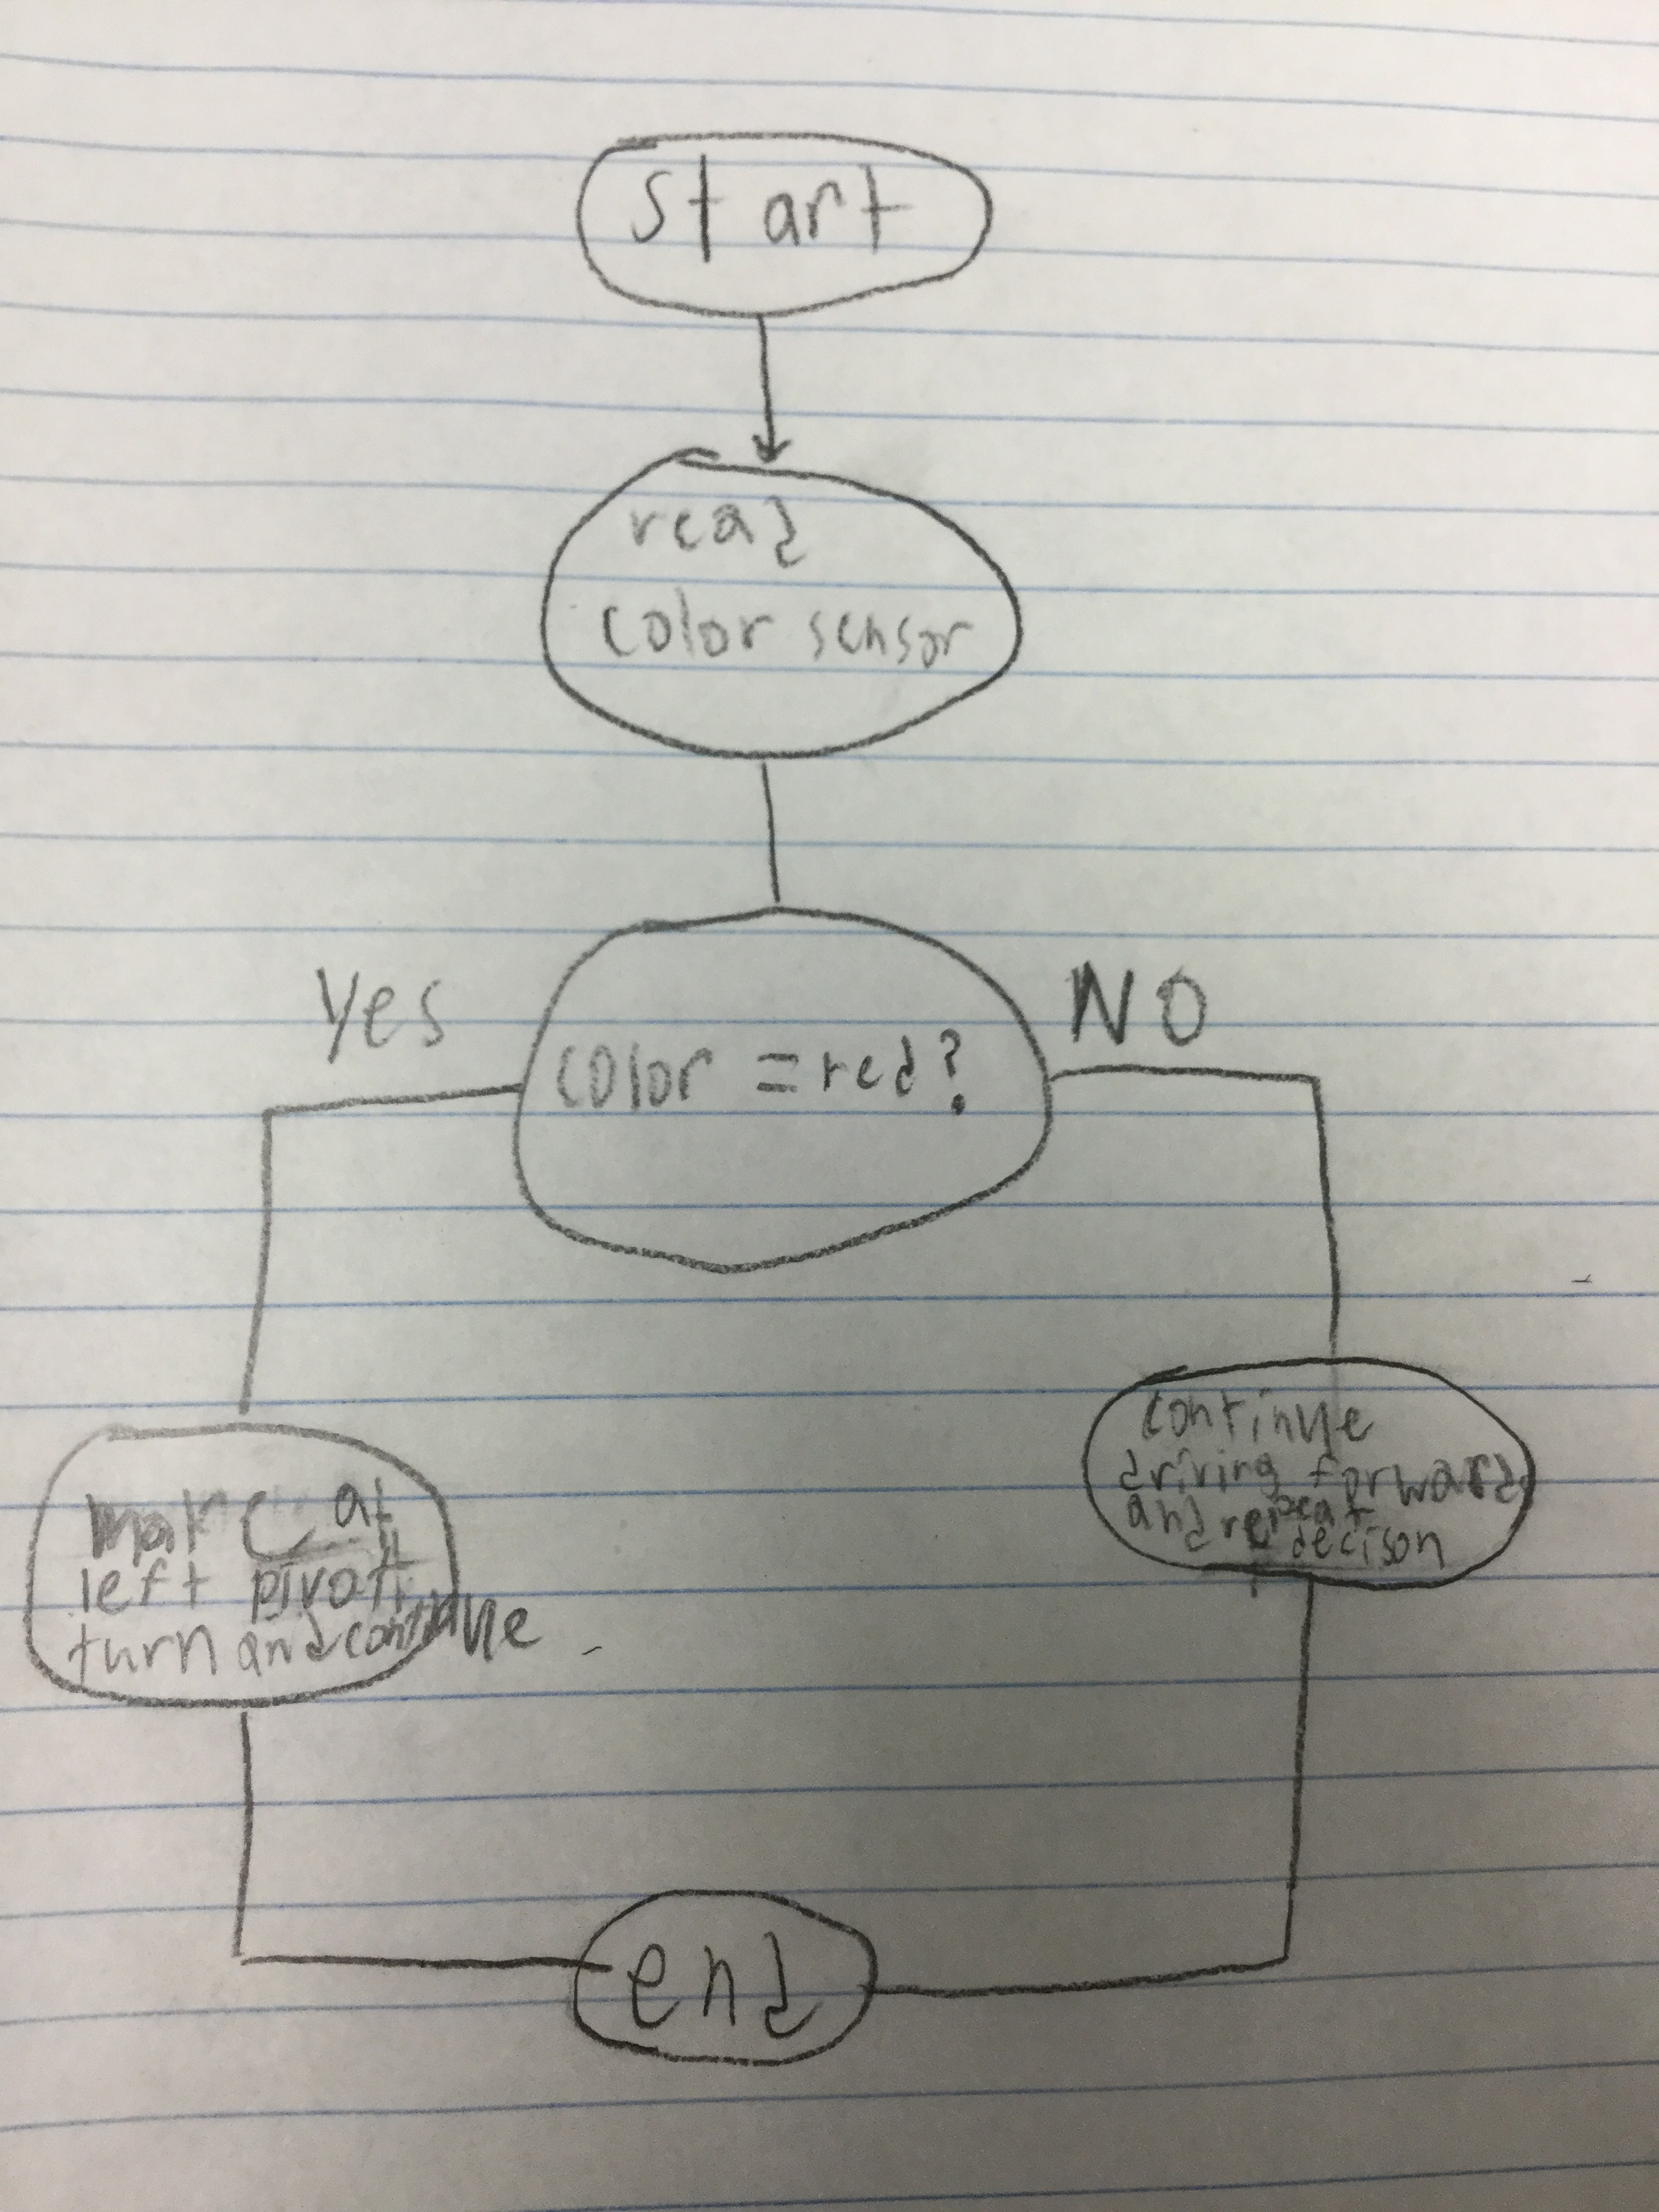
I also made an algorithm before coding. We can change it once we started coding. Below I have my algorithm I started off with.

If it detects red, it’ll make a left pivot turn and continue until the color sensor sees white. If the color sensor does not detect red, keep going and repeat the decision.

Building Plan

In this challenge, I used the Lego EV3 TRACK3R robot by Lego Mindstorms. You can find information about it here. I also added the color sensor which will be in the back of the instruction manual for the robot.

Building Progress Reflection

When I first tried running the program, the color sensor detected the redline, but when it turned, it turned the wrong way.

To fix this, I changed the direction of which the robot would turn when the red line was detected.

Once I switched the direction, it was turning the correct way it needed to, but it was not turning enough

To solve this, I experimented with different degree turns, until it successfully turned enough, which was a 145-degree turn. Once the robot was able to complete the challenge, I decided to add the Victory Fanfare from Final Fantasy once it completed the challenge. The notes weren’t playing the keys that I programmed them to, so I moved all the notes up an octave, which solved the problem. The cause of the problem was of the small speaker in the EV3 robot speaker wasn’t large enough to play the lower notes.
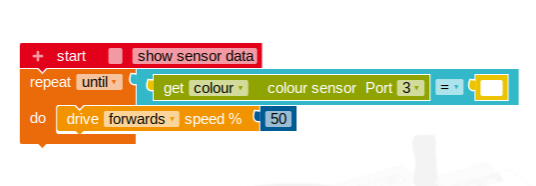
Program

This is an image of the Open Roberta programming I used for the robot.

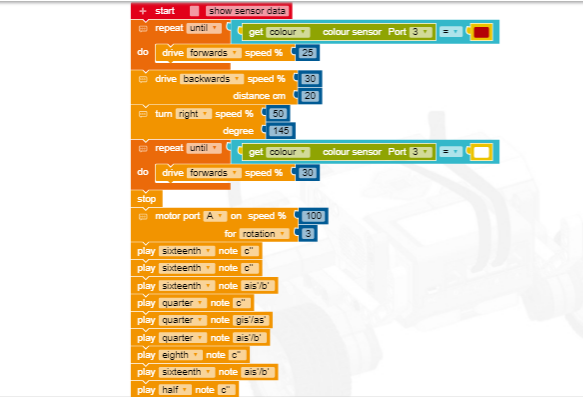
The coding of this challenge was similar to the Make it Move Challenge, in the sense of having the robot move forward until the color sensor senses a color. After that, all I needed to do was add a turn, and have the robot drive forward until it reached the end of the board.

The easiest part of having the robot completing the challenge was the parts of the code that I have used in the previous challenge since I have already used, therefore making it easier to program. The hardest part of this challenge was troubleshooting the rotation. It was hard because I had to repeatedly keep changing the degree value until the robot turned enough to complete the challenge.

Fifth Challenge: The Siege

Final build of the robot that will storm the castle and collect balls and put them into goals.

In this challenge, you will have 2 rounds during the challenge. One being autonomous which you will program your robot to move around the playing field to collect a ball and put it into a goal. The second round is tele-op. In tele-op you will be using a remote control to manually control your robot to collect particles.

Algorithm

I didn’t get enough time to code my full algorithm, but I did program a taunt which got me 5 points.

I didn’t spend enough time on the coding as I needed to, I spent too much time modifying my robot physically and not enough time spent towards trial and error with the coding part of the challenge. The main code that got me 5 points every round was coding in a taunt, it was worth 5 points which still helped my teammate and I get in the lead.

Build Plan

After working with my build plan, I realized I didn’t have a gyroscope to use.

My build plan was based off the idea of how a forklift works. The main mechanism was used for lifting the particles and moving them where they needed to be. This helped out in the end by lifting the particles so the other team couldn’t knock the particle out of the reach of my robot. In the end the mechanism did have a few failures, mainly the arm collapsing while trying to pick up a particle, but most of the time it did properly work during the challenge.

Building Progress Reflection

This was my first idea for a lift. I used a string and tied it creating tension that would lift a particle.

With this being my first prototype, I was very excited for it to work. The main problem with the mechanism was the string kept slipping.

My next idea was to use rubber bands since they naturally hold things together when stretched.

After changing the strings for rubber bands, I thought this would work, then the rubber bands kept breaking on me. The rubber bands were old and would eventually break once in use.

I then settled on this design. Since the material was plastic and worked like a tank tread this didn’t have any point of failure in the mechanism.

A classmate brought in an extra add-on kit for the EV3. She let me use the tank treads the ultimately fixed my problem with the tread not working.

When the button enter is pressed, read infrared proximity, if it is less than or equal to 40 move backwards and turn, if not keep moving forward looking for yellow.

This code wasn’t fully created, which in the end the robot didn’t collect any particles. Although I did code it to try and find a yellow ball on the field, but I didn’t have enough time to tell it what to do once it was found. What mainly got me points during the 1st round was taunting. It was 5 points, but it was better than no points at all. A link to my code would be found here.

The easy part about this challenge was the tele-op round. I could control the robot where I wanted it to go and collect particles. The hard part of this challenge is either coding the robot or fixing my lifting mechanism.

Fourth Challenge: Put ball in cup

In the Fourth Challenge you will have to put a blue ball into Mr. Vanderhoof’s cup and a red ball into Mr. Patterson’s cup. The robot has to put the proper color ball into the proper cup 6 times at random.

Algorithm

When the enter buttons is pressed the program will start. It’ll lift the ball, if it equals red, turn right and drop it, if it is blue, turn left and drop it.

When I start the program, it will move motor A up, then it’ll look for wither red or blue, depending which ball comes at random. Then whichever ball is picked up, it’ll read that color and turn accordingly.

Build Plan

The robot had two motors on top to turn the lifting mechanism and had a color sensor on it to read the color of the ball.
When I started building, I realized I didn’t need to have two motors, it was a bit overkill.
I then added support arms to pick the ball up more easily.
I then realized the problem I was having was it falling out in the back, also the support I added made it so I couldn’t pick the ball up.

Even though I tried many different varieties of solutions to complete the challenge, I wasn’t able to complete the challenge, the mechanism that I burned most of my time on was for nothing since it didn’t work.

Building Progress Reflection

I spent too much time on the building aspect on it because I couldn’t complete the challenge. I wish I would’ve known not to spend as much time as I has, so learn from my mistake and don’t spend too much time on the building process of the robot.

Third Challenge: Get Lifted

In this challenge, you will change the design of your robot in order to lift a jug full of water tied onto the robot with a string so that you can pull 4 joules worth of work. The use of gears will help get more power out of your little motors by using what’s called a gear ratio. Using gears will help take stress off the motors and get more power out of the motors then what you would usually.

Algorithm

When the enter button is pressed it will start the program, just so that if you’re not quite ready to start the program, you have a fail safe to go on. The b and c motors will start to drive forward to lift the jug, When the infrared sensor detects less than or equal to 6 cm, it’ll stop and start detecting if the down button is pressed, when it is, it’ll move both b and c motors backwards.

Building Plan

The first modification I made was to add a motor on the top of the robot, I then realized that this was not going to be enough to complete the challenge.
I then added a touch sensor so the jug will hit it, to tell the robot to drive backwards. I also then decided that I needed to add another motor for more power, I also decided to change the touch sensor to an infrared sensor
I added gears so that the the motors can do more work. I also added support for it as well so that the motors won’t fall of and nothing will break.

As I was going through the process of testing the robot, I was mostly adding more support and making the robot lift more efficiently. At the start of the challenge, I didn’t realize how much I needed to change the design of the robot until I realized that it had to do a different task and the robot won’t be efficient enough until I build a new design of the robot that will lift the jug efficiently.

Building Progress Reflection

Programming the robot was a little challenging because of what I wanted the robot to do after lifting the jug. After it lifting the jug, I wanted the b and c motors to move backwards when i pressed the down button on the robot, but i couldn’t get the program to move on after the distance sensor was less than or equal to 6 centimeters. I fixed this by using the “repeat until” instead of the “if, do” block.

When enter pressed, drive forwards b and c motors until infrared sensor is < or = 6 cm, when it is true, when down button pressed drive backwards b and c motors.
These are the trial and errors I went through going through my coding and modifications to my robot.

When the robot lifted the jug, it used about 4.28 J to lift the jug. The robot also use about 21 mW of power to lift the jug with the two motors. The robot ended up having a 26:20 gear ratio in the gear boz so that it’ll lift the jug with less power.

There was no really easy part this challenge, the hardest part was building the robot so it’ll complete the challenge in an orderly fashion. The programming aspect was hard as well because of the decisions the robot had to make based on its outer surroundings.

First Challenge: Make it Move

For challenge 1, you will be building the Lego Mindstorms EV3 TRACK3R robot and using the Open Roberta software to drive the robot straight on a board without going over it, as pictured below.

If the robot passes the line, the robot failed to complete the challenge.

Algorithm

The robot repeats driving until the color sensor doesn’t sense brown.

  • 1: Drive at 50% speed
  • 2: Repeat it until the color sensor detects white

Building Plan

This will be the final robot once you are done building it.

The robot you will be building is called the TRACK3R. The instructions and information for the robot can be found at Lego’s website.

Program

Pictured below is the program I used for completing the challenge. I made it specifically to use with the color sensor.

This is the coding from Open Roberta, used to complete the challenge.

The code says to repeat driving forwards until the color sensor will detect white. I used the color sensor instead of driving a certain distance because it doesn’t matter the length of the track, it’ll still stop before going over it.

Building Process Reflection

The components I added were the color sensor to the front of the robot to detect when the robot does not sense brown in my programming. I also changed the mechanism in where the color sensor attaches to the robot so the sensor can go lower to the ground.

The first problem I ran into was the robot wasn’t moving all the way across the board, so I then measured the length of the board and also factored in the length of the robot which has to start in front of the board, not on the board. Then again, the robot was still only making it part way.

I then saw that I could add a color sensor. I then changed my code to repeat driving until the color sensor did not sense brown, the color of the board. There I ran into another problem, the robot would go over the board now. After inspecting the robot, I may have found a reason why it was going over the board, maybe the color sensor was not fast enough to detect the change in color. I then modified my color sensor to extend out further. Once I did that, the robot was still going over the board.

After a few more runs along the board, I then figured out the source of the problem, the color sensor was not detecting the ground until the robot went over the end of the board, which at that point the robot teeters between the board and ground. I moved the color sensor closer to the floor, which fixed the problem and the robot stopped at the end of the track without crossing the lines.

This is a trial log of my attempts at completing the challenge.

The most difficult part of this build was most likely troubleshooting the color sensor since I didn’t know exactly what was going wrong, I had to observe what was going on with the robot at the time it should be stopping and detecting that the board was not there anymore. What worked well, for the most part, were the motors and structure of the robot. The robot had a consistent run which was good for troubleshooting and testing since it ran the same everytime which was one less variable to consider during the troubleshooting process which made it easier to find the source of the problem.